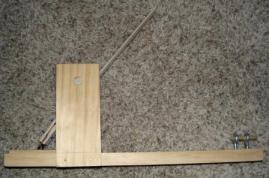
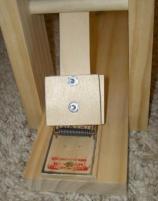
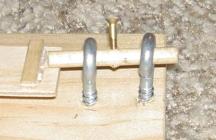
There are several catapult plans on the Internet, for Webelos Engineer #9 requirements. Here’s one using a mousetrap that I  made twice with each of my Webelos dens, that I want to share with you. This one’s not too complex to build and having a miter saw and a drill press will make it fairly easy (but these are not necessary). This catapult takes quite a bit of prep time, and with the Webelos Engineer activity pin scheduled for February and March, there is plenty of time to work on this.
When I did this in the den, I had all the items pre-made and in bags at the beginning of the meeting. It took one meeting to build, and at the end of it, we had a fun game of shooting pennies into cups. You can choose to pre-fab all the material or if you want you can have the boys do some of the prep work. (As a reminder, the boys cannot use power tools).
Materials:
Mousetrap with the bait-holder and hold down bar removed.
Base: 3-1/2″ x 3/4″ pine or other softwood, 15-1/2″ long.
Sides: 2-1/2″ x 3/4″ pine x 6″ high. You will need two of these.
Crossbar: 1/2″ dowel x 5″ long. This stops the forward motion of the launch arm.
Wood connectors (to connect mousetrap to launch arm): 2 quantity 2″ x 2″ wood pieces 1/8″ thick (these need to be wide and tall enough to fully enclose the mousetrap snap bar).
Launch arms: good quality paint stirrers from a home improvement store, with a small wood piece glued near the top (used to hold the item being launched).
Screws for wood connectors: 2 quantity machine screw/washer/nut, 1/2″ long, #6 size.
Wood screws (to mount mousetrap to base): 3 quantity #6 x 3/4″.
Finish nails: 4 quantity 4d finish nails to attach sides to base.
Firing pin: 1/4″ dowel approx. 2″ long (cut to fit your particular firing layout). Also, a wood screw to pull the firing pin, #4 x 3/4″ (or you can use a nail for this).
Firing pin holder: 2 quantity eye bolts that will fit a 1/4″ dowel (the ones I found at the home improvement store were labeled #206).
Pre-drilling
The following items were pre-drilled before the meeting, using a drill press, to get exact 90-degree holes. Without a drill press, you will need to carefully drill to get as close to perpendicular holes as possible.
1) A 1/2″ hole drilled through the side arms, centered and approx. 1″ from the top. This is for the stop bar (the 1/2″ dowel piece).
2) Two small holes drilled through the bottom of each of the side arms, for the finish nails (pre-drilling prevents the side arms from splitting when hammering the nails through them).
3) A small hole drilled through the firing pin, to hold the wood screw.
4) Three holes drilled through the mousetrap, for the wood screws that would attach it to the base.
Step By Step Instructions
Below is a link to a scan of the step-by-step instructions that I prepared for our district day camp last summer. This should walk you through how to put these together. (If you would like these instructions in a Word document, please e-mail me and I can send them to you).
http://thetrainerscorner.files.wordpress.com/2008/12/engineer_mousetrap_catapult_instructions.jpg
As with all crafts, it’s important to build one well before the meeting, to make sure everything works and can be done in the allotted time. Please note that the firing pin is actually one of the most difficult steps, and can be skipped to save time.
Good luck with this! I hope these are as much fun for you as they were for my dens. Please let me know if you have any questions.
http://thetrainerscorner.wordpress.com/