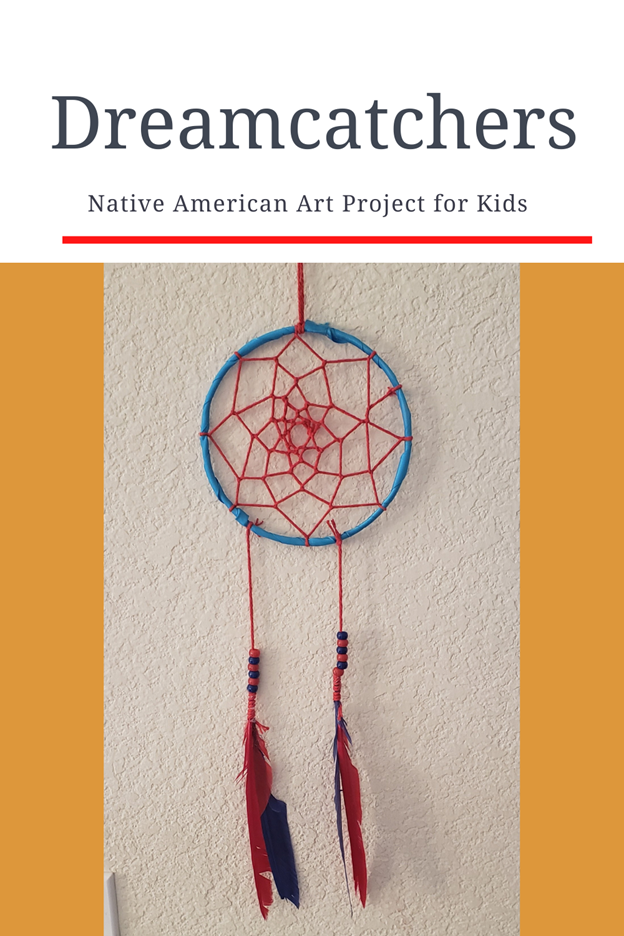
Dreamcatchers are an iconic Native American symbol. It is unknown exactly when and where they originated. They were first documented in 1929 with the Ojbwie tribe and spread to other tribes during the pan-Indian movement of the 1960s and 1970s. They are traditionally made of all-natural pieces, such as willow bark for the ring and sinew for the webbing. They are said to protect the user from bad dreams. According to Native American legend, all dreams pass through the catcher; the bad dreams stay stuck in the netting and the good dreams flow down the feathers to the owner sleeping below.
The kids had a blast making these and were excited to learn about Native American heritage. We used metal rings and yarn to make them easier and cheaper to make. The kids enjoyed bringing their Indian creativity to this traditional Native American craft and I’m sure yours will too!
Supplies
(Clicking on each item will open a new amazon tab with our affiliate link. This means we will earn a small percentage of the sale, at no extra cost to you.)- Metal Hoops
- Hot Glue Gun & Glue Sticks
- Ribbon, Leather Strips, or Twine to Wrap the Hoops
- Feathers and/or colorful feathers
- Beads (We Used Pony Beads)
- Charms (Optional)
- Anything else you may want to use to decorate your dreamcatchers
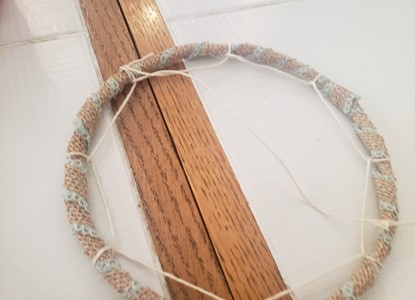
Wrapping the Hoops
- Using your hot glue gun, glue the end of your ribbon directly to the metal hoop. If using string, yarn, or twine to wrap, you can tie the end on and skip the gluing.
- Wrap the ribbon around the metal hoop until the hoop is completely covered.
- Once the hoop is completely wrapped, cut the ribbon and glue the end to the hoop. You are now ready to create your netting!
- Creating the Netting - Tie the end of the string or twine onto the wrapped hoop.

For the first row: We spaced our sections about an inch and a half apart. To create the first row, cross your string over the top of the loop about an inch and a half from where you tied the string to the hoop. Wrap the string around to the back of the hoop and pull the end through the loop you just created. Repeat around. (We used the mantra “Over the hoop and through the loop” to help the children remember the steps)
Once you have made it all the way around the hoop, you will need to move down to the second row. To do this, pull the string through the first section you created. Move the string to the middle of the section. From there, you will place the string over and through the center of the next section. Then pull the string through the loop you just created, just like you did when you made the first row. Continue around until netting is complete.
If you would like, you can add beads or charms to your netting. To do this, just thread them onto the string when you are working on the section you want to place the bead, then tie a knot to keep it in place.
Once the netting is complete, tie a fast knot and tie off. Then cut off the excess string. You can now move onto decorating.
Decorating the Dreamcatcher
We used beads and feathers to decorate our dreamcatchers. We first used the hot glue gun to glue the feathers together. Then we put a line of glue on the end of the feathers and wrapped the twine around them. We threaded beads onto the twine and tied them to the dreamcatchers, and that was it! Your dreamcatcher is now ready to hang up!
Sources
Dreamcatcher. (n.d.). Retrieved October 06, 2020, from https://www.newworldencyclopedia.org/entry/dreamcatcher